Planning a trip as exciting as it may be can quickly turn into an overwhelming process. Even though I have traveled frequently I get anxious thinking about where to go, how long to visit, where to stay, and how I’m going to around a city I don’t know. Since using Google maps trip planner it has put my mind more at ease.
As many travel applications as there are the one that has helped me the most is Google Maps trip planner.
So let me introduce you to your new pal and BFF when planning a trip. Let’s learn to plan one epic trip using the Google Maps trip planner!
This article may contain affiliate / compensated links. For full information, please see our disclosure here.
Lover of travel tips? Check out these related posts:
- Carry On For Long Flights
- How To Survive Long Flights In Economy
- How To Take Care Of Your Skin While Traveling
- Things To Do At The Aiport
- 66 Genius Travel Hacks
Why You Should Use Google Maps Trip Planner
The Google Maps trip planner is an excellent way to organize all the places you want to explore in one itinerary. You may have received an overabundance of recommendations from friends or reading blogs and this nifty application allows you to save them all in one spot. During your trip you can always whip our your Google Maps and see what is nearby.
How To Use Google Maps Trip Planner
1| Set Up A Google Maps Account
First thing is first, you need to create a Google account (it’s free), visit this link here if you do not have one already. You need to do this first before moving forward with the other steps.
2| Make A New Google Map
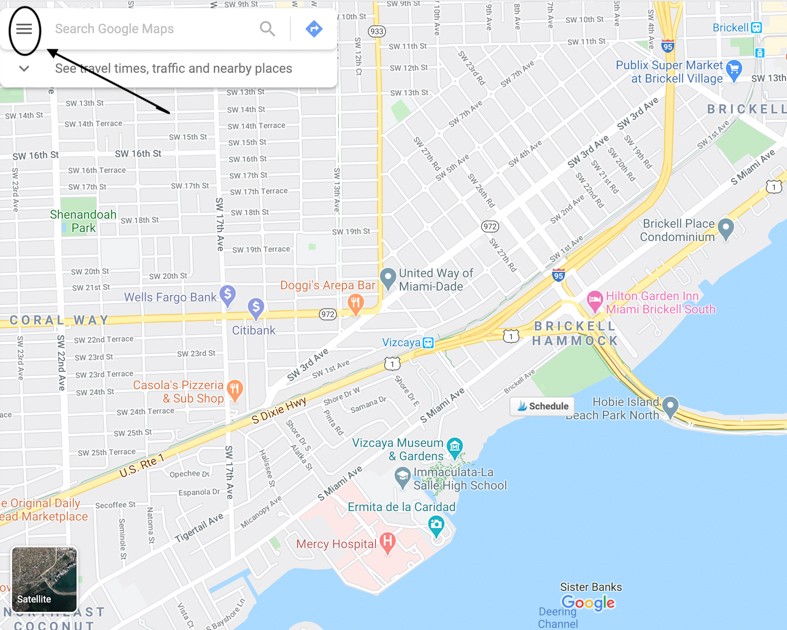
Before we get started I suggest using your computer, it makes the following steps a little easier. After you created your Google account open Google Maps with this link and log in with the account information you just created. Select the 3 horizontal lines located in the top left-hand corner and in the drop-down menu click “Your Places.”
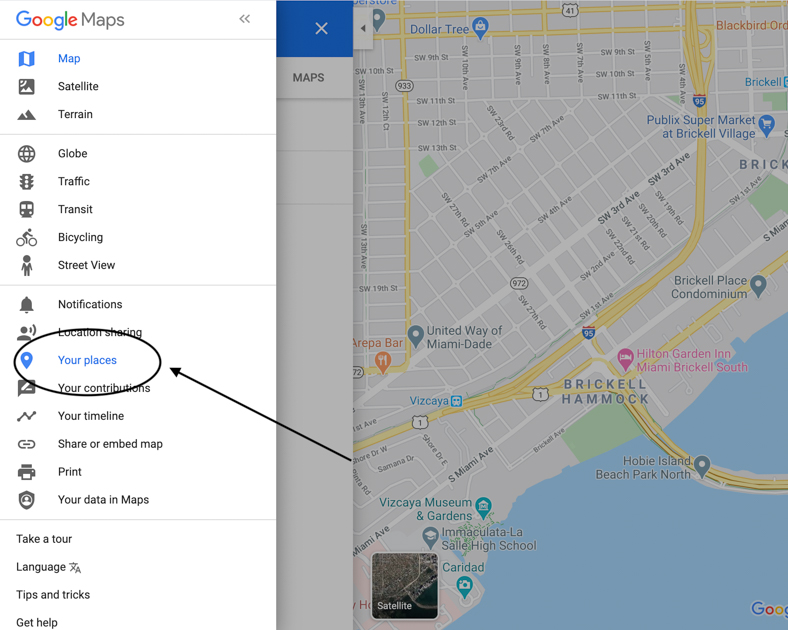
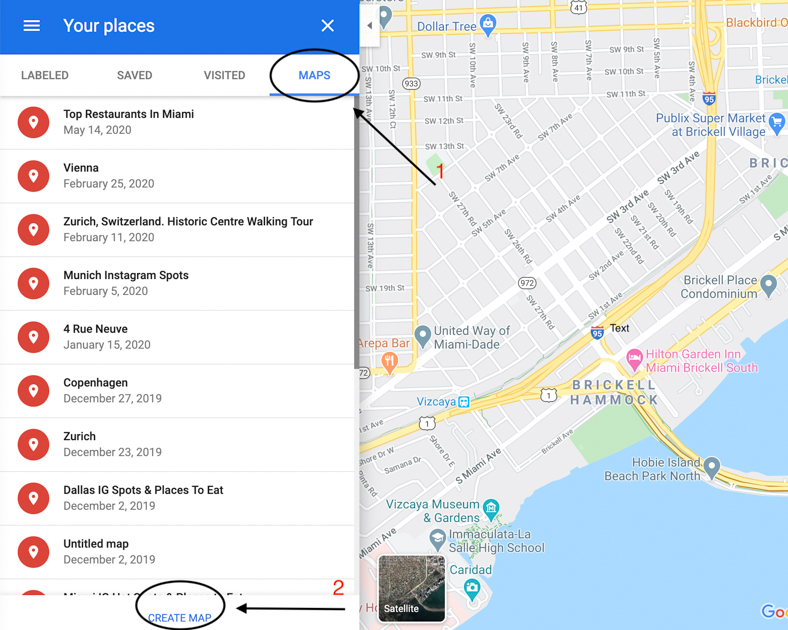
After you select “Your Places” you will be redirected to another page, click on “Maps” in the top right-hand side of the menu. Do not freak out if you don’t see anything. Since you haven’t created any maps as I have, it will be empty. Don’t worry, we are going to make one!
Look at the bottom of the menu and select “Create Map.” After you made the selection you will be led to an untitled map with an empty menu where the name and description are missing.
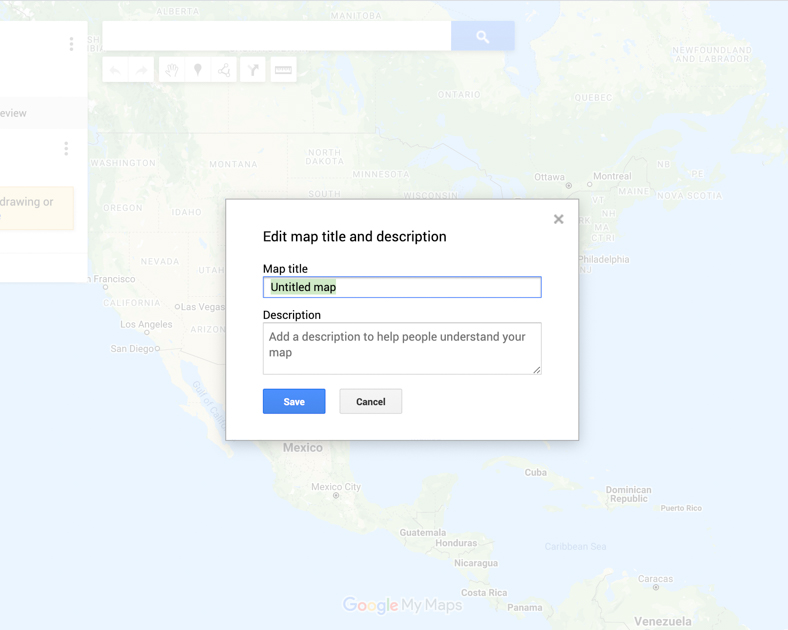
Choose “Untitled Map” and immediately after a text box will appear in the middle of the screen. Give your map a name and put any description you like. Tada, you just created your first map on your Google Maps trip planner.
3| Add Categories To Your Google Maps Trip Planner
Before adding location pins, think of the types of things you would like to do on your trip. Putting all your activities into categories makes travel planning much easier. Here is a list of some of the categories I use in my Google Maps trip planner:
- Restaurants & Bars: This is a great category to add all the restaurants you would like to try. When you are out and about and decide to grab some grub or a cocktail, you can see what places are nearby.
- Cities: If you plan on hopping around a country or State it is great to tag additional locations for where you may want to pop in and visit.
- Activities: This is where I like to add activities planned such at tours, beaches, cooking classes, etc.
- Hotels: If you will be jumping around to different hotels you can figure out what sites and activities are near to where you will be staying.
- Sites: Here I like to include all the museums, historic places, and Instagram spots.
- Shopping: List all the farmer’s markets, souvenir shops, or boutiques you researched here in this category.
How To Add Categories To Google Maps
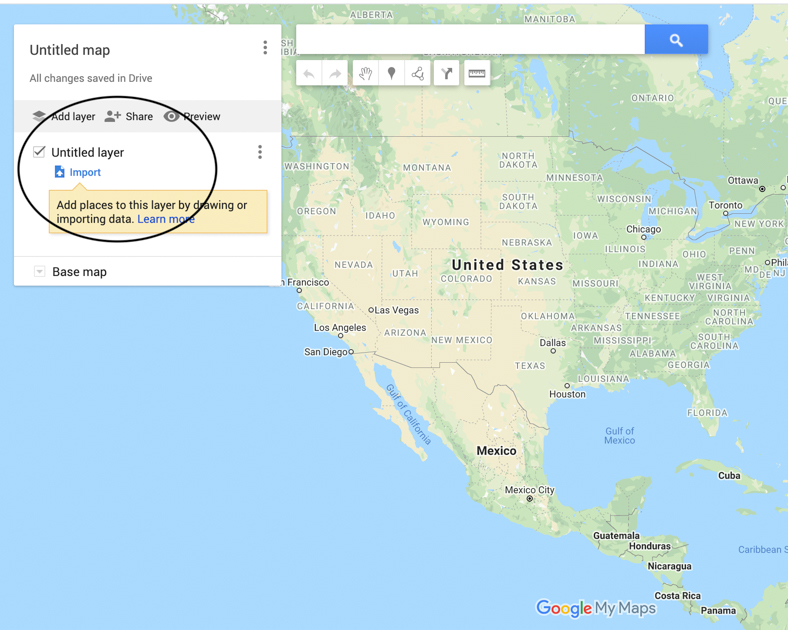
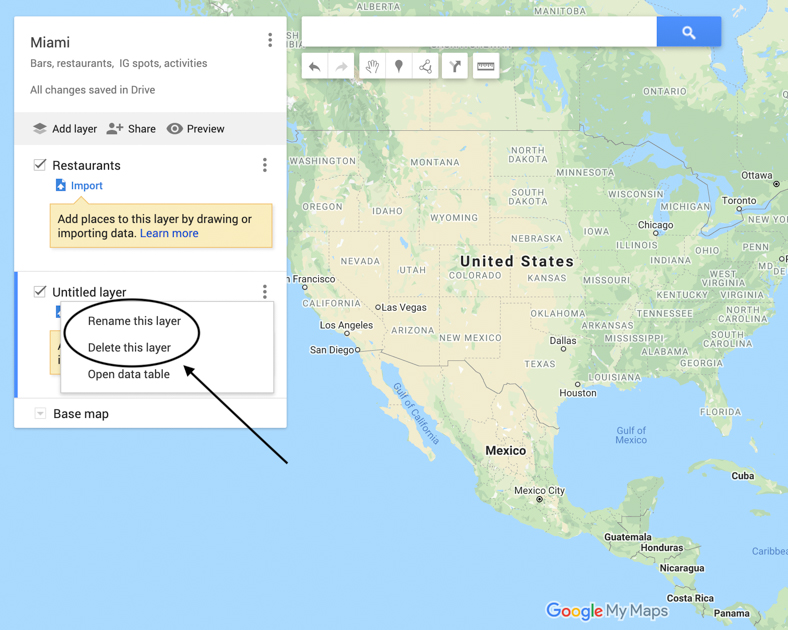
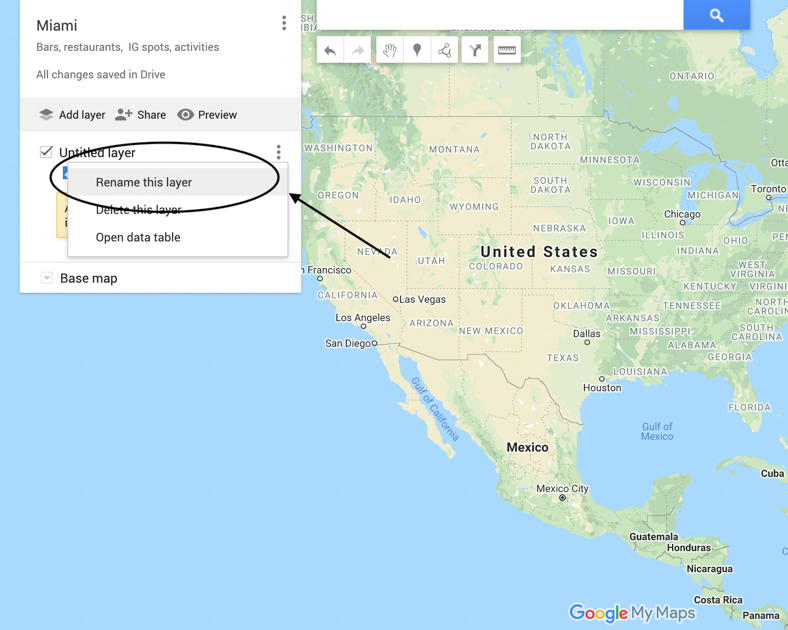
Once you created the list of categories to add to your map, we need to add “layers” AKA “categories. But, first, click on the 3 vertical dots next to “Untitled Layer” and when the dropdown menu appears select “rename” and choose your first category to add to your Google Map.
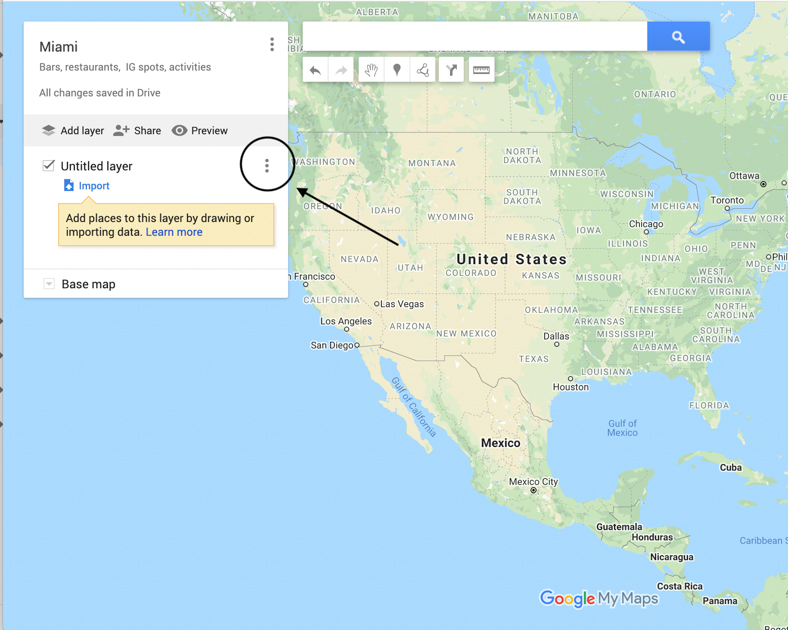
Now it is time to add all the categories you want to include on your map by selecting “Add Layer” the first selection on the left-hand side of the screen. Just like we renamed the first “Untitled Layer” above you will need to do the same for all your categories.
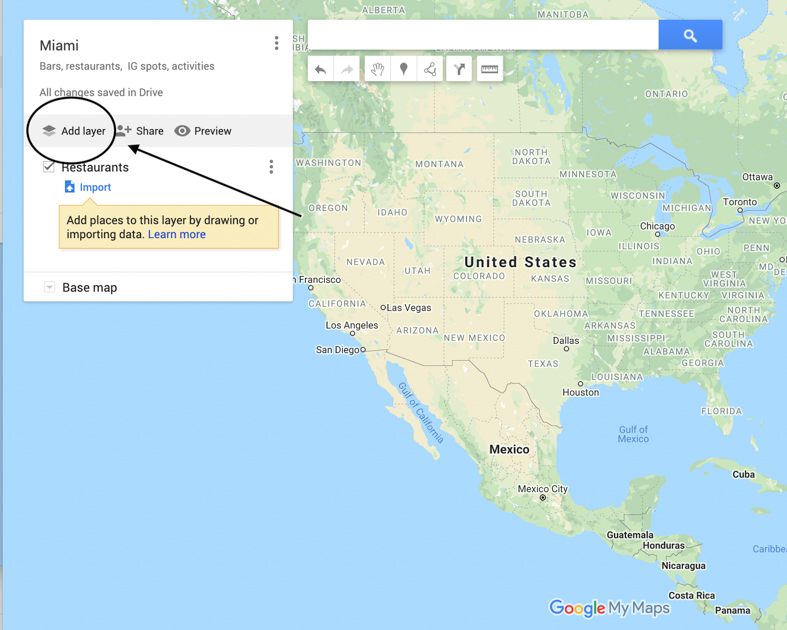
Don’t worry if you make an error it’s an easy peezy fix. Just click on the 3 vertical dots next to the “Untitled Layer” and you will have the option to delete or rename your mistake.
Or if you just need to rename your category, select the category name that needs some fixing and a box will appear for you to make changes.
RELATED POSTS: Everything You Need To Pack In Your Carry-On To Survive Long Flights
4| Input All Your Places To Visit
You probably have a pretty hefty bucket list of everything you want to see where you are going.
Now we need to put all the inspiration you collected from friends, Instagram, travel blogs, or Pinterest in one organized space onto your Google Maps.
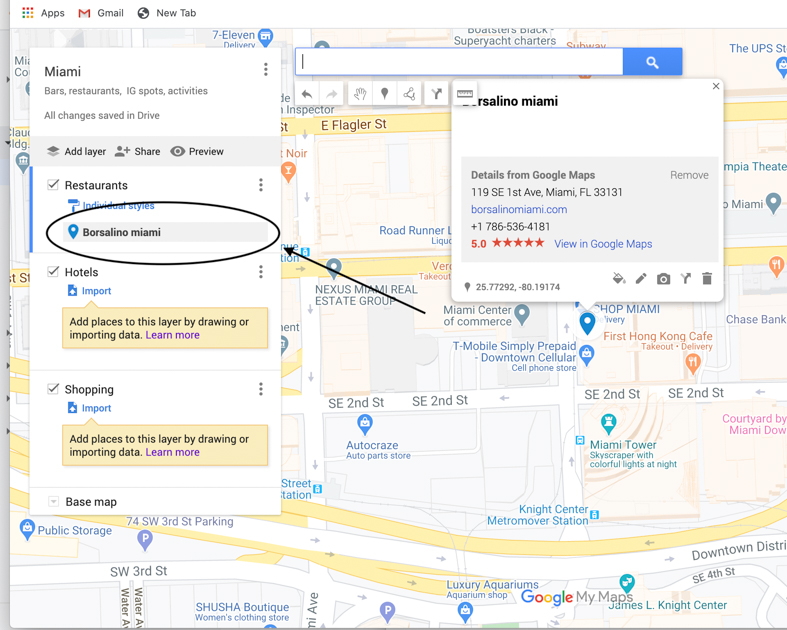
To add your first item, select the category for your first location marker. Say I want to add a specific restaurant to my “Restaurants” layer, I will then type the name of the restaurant in the search bar.
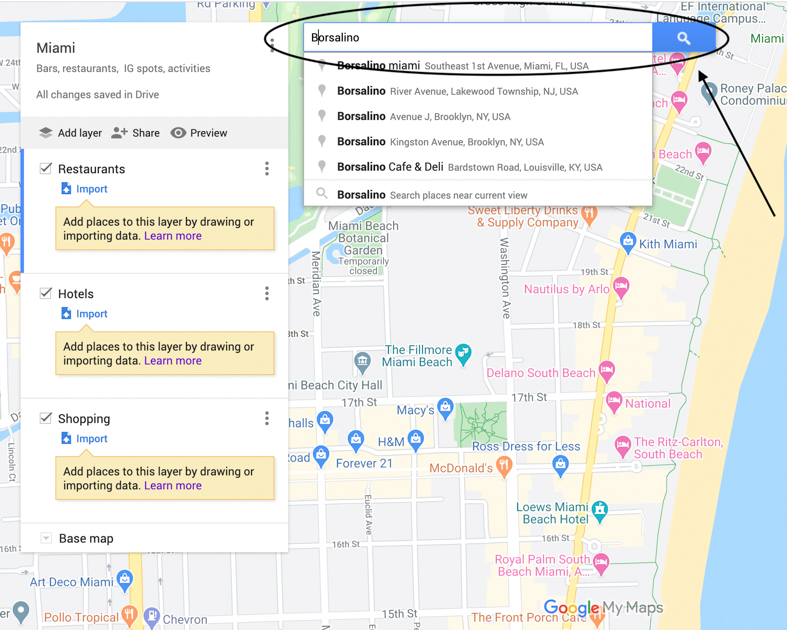
When the location you are searching for appears in the bar, click “Add to Map.”
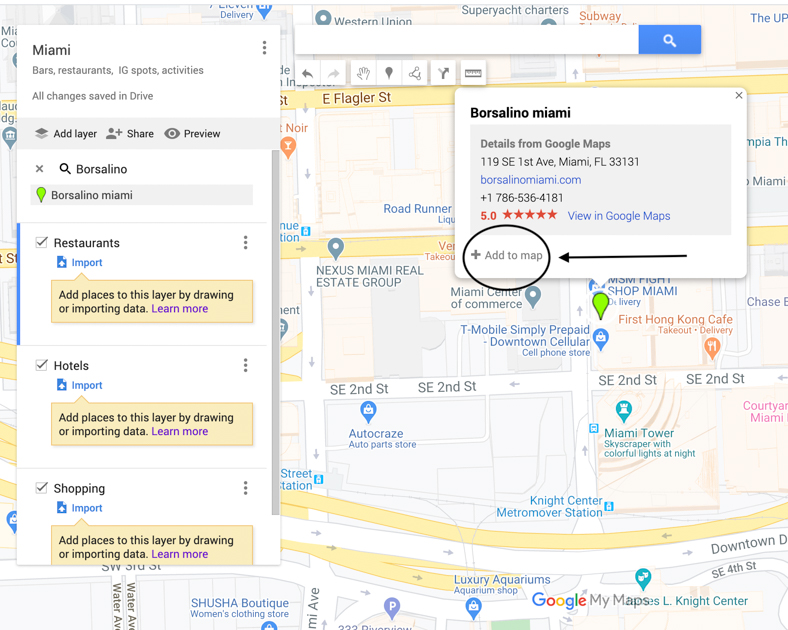
Voila, you added your first location pin to your Google Maps.
What If I Add My Location To The Wrong Category?
Now, if you put a location into the wrong category, don’t freak out. Select the location you need to change and drag it into the correct category.
Oh No! What If My Location Isn’t Listed On Google?
If you type in a location in the search bar and nothing pops up don’t panic. Google just hasn’t made a location yet. To fix this type in the address manually in the search box and give it a name you want.
*To remove a location from your category just highlight it and in the marker’s location box select the trashcan icon.
5| Customize Your Google Maps Trip Planner
Now it’s time to organize your map and make it super pretty. With Google Maps you can make customizations by adding icons, changing colors, and adding notes, and images.
Customize By Color Coding
Color coding your categories is a great way to visually organize your Google Map.
To do this highlight the location item you would like to customize than a marker’s pop-up window will appear. Click on the paint bucket icon located at the bottom of the box and a selection of colors will show up.
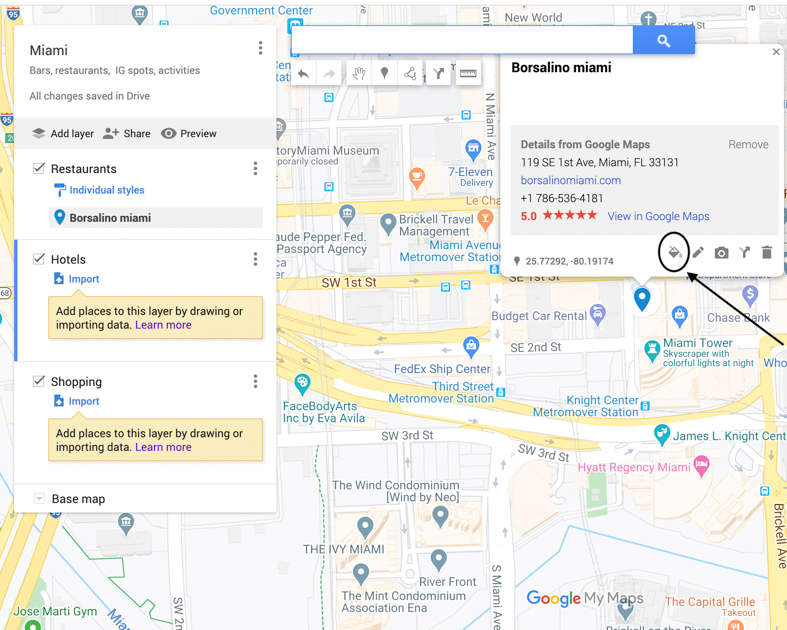
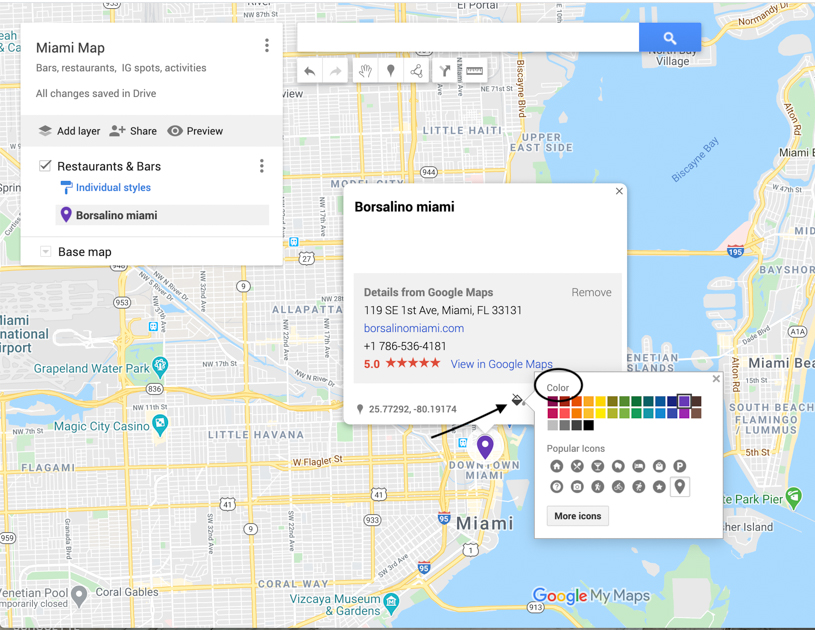
Let me tell you why color coding is great for organizing your Google Map:
- Color code categories: I personally prefer to make each individual layer (category) a specific color. For instance, all “Activities” may be black, “Shopping” orange, and “Hotels” green.
- Color code sub-categories: I like to put my items into sub-categories so I am not overwhelmed with too many layers. For instance, in my “Restaurants & Bars” layer I listed cafes, bars, and restaurants I would like to visit and assign each of the a different color. For example, you could mark all cafes yellow and restaurants purple and so forth.
- Color code priority: Another great way to use color coding is to prioritize all the places that are on top of your list in red or a preferred color you choose that will help you remember. So when you’re on your trip you know the places that are of highest priority so they get checked off your list so you know they are a must-see.
- Customize By Icon : Another great way to organize your Google Map is by changing the icon in your location pins. You can change the icon by following the same steps for color coding. Just highlight the location item you would like to customize from the marker’s pop-up window, when it appears click on the paint bucket symbol- then make your selection under “Popular Icons.”
If you don’t see the icon you’re looking for in the “Popular Icons” select the “More Icons” box and a large selection of additional icons will pop up.
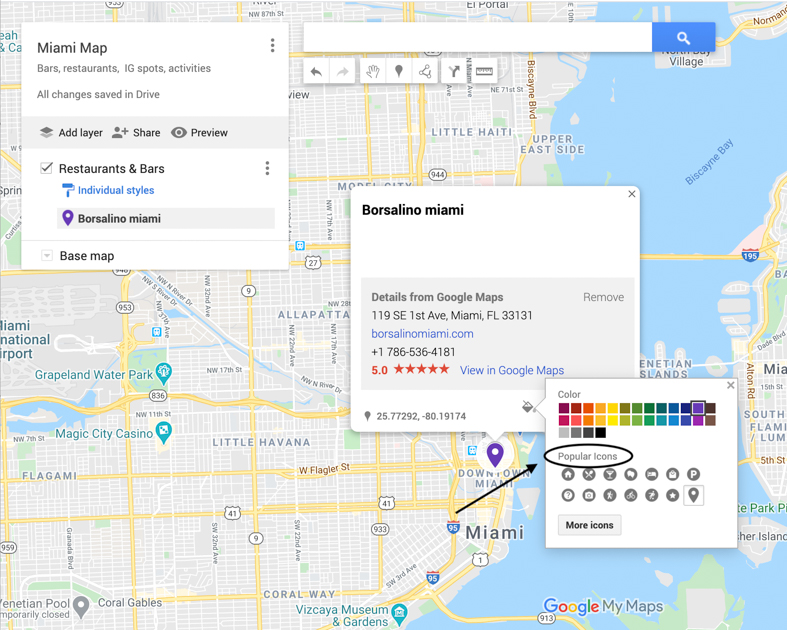
Besides color coding I find changing the icon for my location pins super helpful. With all the excitement going on during your trip, you may forget what all the colors mean for each category. Well, I have a solution for that so don’t worry. This is where the icons come in handy so you don’t have to keep revisiting the legend.
For instance, let’s revisit my “Restaurants & Bars” category. I would select a martini glass icon for all the bars, restaurants use the fork and knife icon, and cafes select a coffee cup. It makes looking at your Google Maps trip planner super easy instead of looking at different colored location markers.
More Customizations
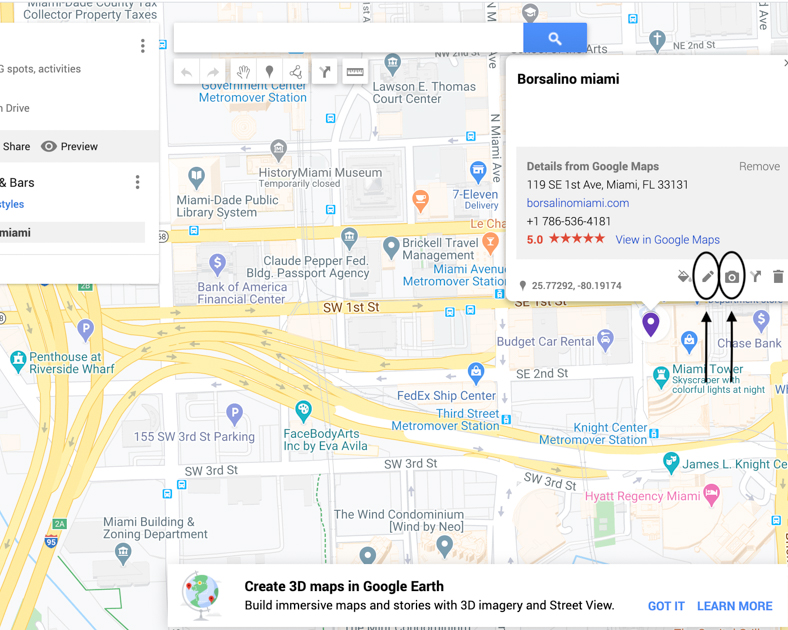
You can add additional customizations to your locations with notes or pictures. Just highlight the location you want to add specifics and select that paint bucket again- from there you will see a pencil symbol to add notes, or select the camera icon to add pictures.
RELATED POSTS: How To Take Care Of Your Skin While Traveling
6| Create Your Trip Itinerary
Now that you finished categorizing your Google Map, zoom out of the map so you can see where all your points of interest are located. Having this visual makes trip planning a piece of cake to creating one awesome itinerary.
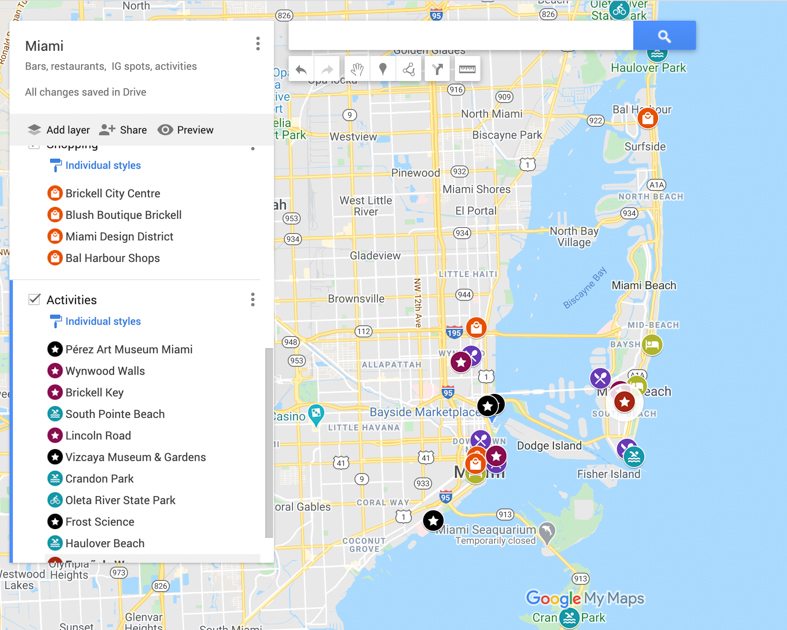
Here you can get an idea of where to stay before booking your hotel and places that are walkable. To save time and money from transportation find all the location pins that are closely grouped together and within the same neighborhood so you can reach them all in the same day.
Once you have an idea of what locations to group together, I like to write an outline in my Notes application on my phone, which it is handy since more than likely you will be on the go. Here I usually write down the day of the week and underneath all the locations to see for each day.
7| Find Out Directions And Distance
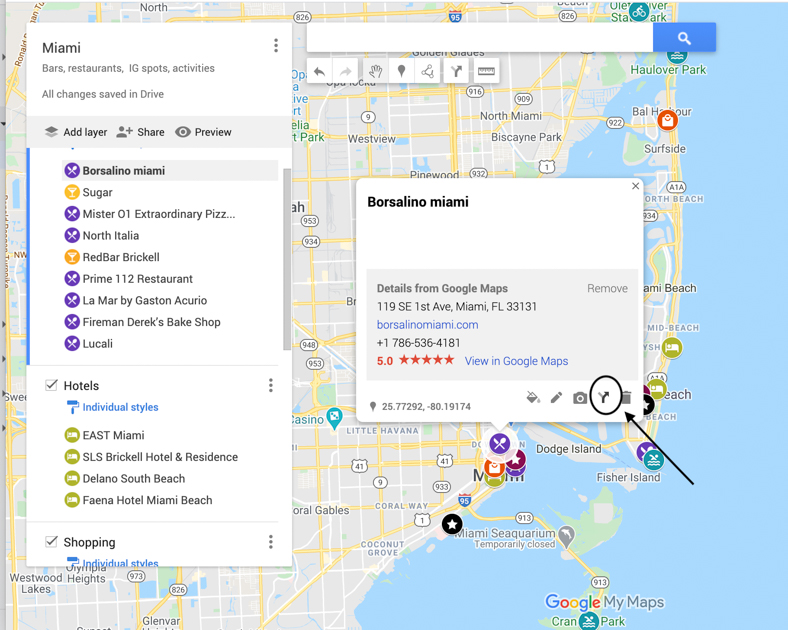
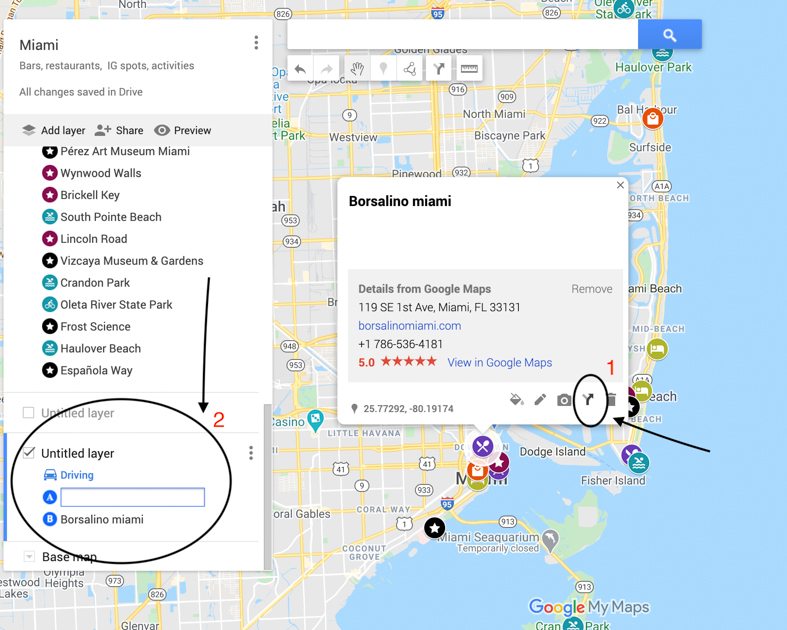
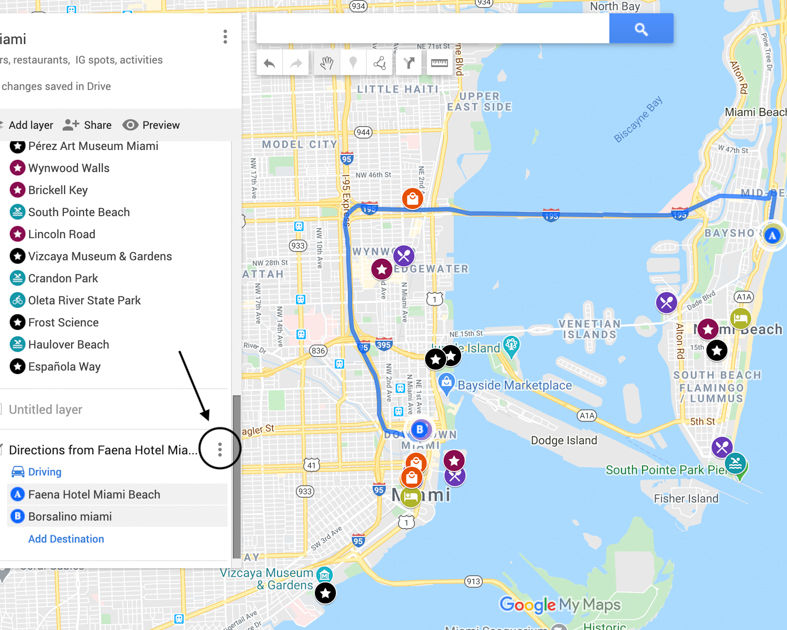
Google Maps is great for step-by-step driving directions and distances if you plan on driving during your trip. Just select one of your locations in your categories and click on the merging arrow in the pop-up menu which will instantly create a new layer on the left side of the screen to complete.
Add your starting location in the empty box next to “A” and for driving directions click on the 3 vertical dots in the right corner of the box and select “Step By Step Directions.”
A pop-up box will appear and you will know the route to get to your location and the time it will take to reach your destination. Since you know how to access directions you can now easily plan a road trip with Google Maps or even sneak in a quick day trip.
8| Share Your Google Maps Trip Planner With Your BFF And Family
Got company joining you on your trip? What is great about Google Maps is you can share it with others. Your friends and family can add to the trip planning process too!
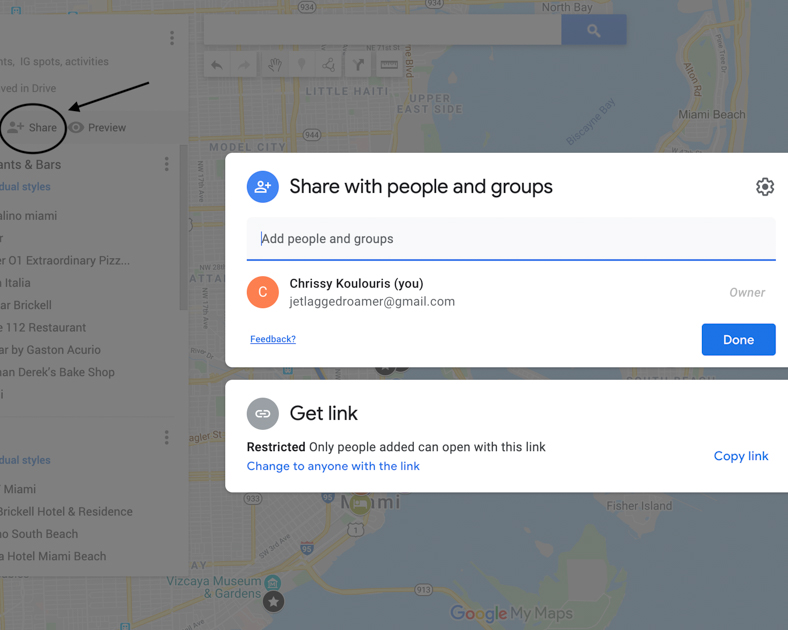
You can easily share your map, by selecting “Share” located underneath the title of the Google Map you just created. After your selection a pop-up box will appear, here you can add everyone’s email address you would like to send your map to into the “Invite People” bar. Just make sure in the box next to the email address “Editor” is selected so they can contribute and make changes before you send.
9| Download Google Maps Application To Your Phone
We finally made it to the last step! Now to have access to your Google Maps Trip Planner on your phone when you’re traveling, download the application from the app store.
Once you download Google Maps, sign in with the Google account you used to create your map on your computer. Access the map you just created by selecting “Save” located at the bottom, scroll to the “Maps” tab on the top right corner then find your map. Directions are for an iPhone, so not sure if accessing your map will be the same for Android. Just look for those same tabs and you should be good.
Yay, you made a custom map! Now give yourself a pat on the back and a round of applause.
Google Maps Trip Planner Conclusion
Woah! That was a lot. But, I hope you found this Google Maps trip planner guide helpful. For your next trip, I suggest following these suggestions and you will see your trip will be more organized.
I have more posts for travel tips and hacks that will be useful for your trip:
- Everything You Need To Pack In Your Carry-On To Survive Long Flights
- 11 Long Flight Tips To Survive Economy
- 66 Effortless Traveling Hacks
- How To Take Care Of Your Skin While Traveling
- Things To Do When Stuck At The Airport
Like this pin about using Google Maps Trip Planner? Share it with others or pin it for later!





This is such a great post! I love traveling “by neighborhood” — so I map out where I want to go using this method you show on my personal Google Map, then I head to each neighborhood & go from place to place.
Hey Shelley! That is so awesome you’re using this application. It makes travel planning and seeing everything really easy!
I just recently made a google map itinerary and i wish i had had these instructions with me :). Will definitely come back here for my next map, which btw, are super useful.
Hey Patri. It is a little tricky using it for the first time. Would love to hear about the next map you make for your next trip!
I love the Google Maps feature! A friend told me about it a few years ago and I’ve used it religiously ever since!
Jori it is such a great application! So glad to hear you love using it!
This was so helpful, thanks for the details. I can’t wait to use this tip on my next trip.
Cirrena I am so glad you found it helpful. Would love to hear how it worked for you on your next trip 😉
Literally love this level of organisation! It is so therapeutic to have an itinerary all mapped out! A really good step-by-step guide – thank you for sharing!
Thanks so much Tam! I try to stay as organized as I can traveling. Hope it helps your planning your next trip!
This is awesome!! Definitely saving for late. We usually use Visitacity, and plan out our whole trip day by day! It’s nice that we can do it on Google and share it! Thanks for the tip
Kelsey thanks for stopping by and reading. So glad you enjoyed the post!
This is such a good idea!! I use google maps a lot but never like this! THanks
Thanks so much Alice! Hopefully, you find it super easy to plan a trip with Google Maps for your next trip!
There’s a lot of great information there, thanks for sharing all of your knowledge with us!
Hi Krista, thanks for stopping by. Glad you enjoyed the information.
I am so impressed!! I’ve used Google Maps for marking down specific locations but I haven’t paid much attention obviously because I didn’t know you could add layers! This is so awesome. Now I can mark down restaurants to see how far it is from where we’re staying. These for these tips!!
Hey Sarah. Thanks so much for reading. Adding the layers is so helpful and makes planning super easy. So happy you enjoyed these tips!
This was such a great and informative post! Thank you for sharing!
Thanks so much Jasmine for reading!
HOMG GAMECHANGER. I never knew you could do this with Google Maps! This is going to save me SO MUCH TROUBLE when we can finally travel again!
Shafinah it really is a game changer! I cannot wait until you use it. I know you will love it!
this is a GREAT guide, I never knew there were so many options in google maps to customize your itinerary. Thank you for sharing! I can’t wait to plan my next trip with this.
That is so awesome Chelsea! I know you will love it. Would like to hear how it worked for you when you do plan a trip with Google Maps!